AI 成績查詢系統
Ted Lee的土饅頭(To Mentor)工坊
Line:ted2016.kpvs
Email:Lct4246@gmail.com
FB:http://gg.gg/TedLeeFB/
Email:Lct4246@gmail.com
FB:http://gg.gg/TedLeeFB/
Blog:http://gg.gg/TedLeeBlog/
Apr. 17, 2022
前情提要
承先前拙作《它認得出我:PYTHON CVZONE + FACE RECOGNITION 函式庫》,本文以 Python 內建的 Tkinter 框架(framework)[2] 為基礎,用程式碼一行一行「縫」出本文的 GUI (Graphical User Interface)視窗示例。然後再修改會安老師分享的人臉辦識小專案後,即可完成本文的「辨識 +UI」設計。其中,我們鋪排的情境是以刷臉查詢個人成績,maker 們也可以將之擴充到:刷臉 do something…。
先玩再說:觀察編程邏輯
已裝妥人臉辨識函式庫的 fChart 開發環境請依照《它認得出我:PYTHON CVZONE + FACE RECOGNITION 函式庫》一文建置妥。本文的範例程式碼可由此下載後解壓縮之。請用 fChart 內置的 Thonny IDE 開啟「AI 成績查詢系統」資料夾內的「AI 成績查詢系統.py」(圖 1)後,直接執行測試之。此外,在測試過程中隨時按下「ESC」可結束程式。其中,讀者可以在行動載具上顯示「趙大明.png」(圖2)或「錢小英.png」(圖3)兩張我們從 FFHQ(Flickr-Faces-HQ)公開人臉資料集(dataset)中取用的人臉照片測試之(讓攝影機分別看這兩張照片)。好啦,請閤上眼睛回想剛剛的測試流程:系統無法識別時會顯示圖 4 的畫面;反之,若可成功識別出自名單內的預設人臉時,則顯示圖 5 的結果。所以,您是否也能畫出類似圖 6 的編程邏輯呢?
圖 2:測試照片「趙大明.png」
圖 6:本文的編程邏輯
已裝妥人臉辨識函式庫的 fChart 開發環境請依照《它認得出我:PYTHON CVZONE + FACE RECOGNITION 函式庫》一文建置妥。本文的範例程式碼可由此下載後解壓縮之。請用 fChart 內置的 Thonny IDE 開啟「AI 成績查詢系統」資料夾內的「AI 成績查詢系統.py」(圖 1)後,直接執行測試之。此外,在測試過程中隨時按下「ESC」可結束程式。
其中,讀者可以在行動載具上顯示「趙大明.png」(圖2)或「錢小英.png」(圖3)兩張我們從 FFHQ(Flickr-Faces-HQ)公開人臉資料集(dataset)中取用的人臉照片測試之(讓攝影機分別看這兩張照片)。
好啦,請閤上眼睛回想剛剛的測試流程:系統無法識別時會顯示圖 4 的畫面;反之,若可成功識別出自名單內的預設人臉時,則顯示圖 5 的結果。所以,您是否也能畫出類似圖 6 的編程邏輯呢?
圖 2:測試照片「趙大明.png」
圖 6:本文的編程邏輯
完整程式碼
首先,將人臉的白名單及其個別成績編碼如下,這隻程式會輸出 .dat 檔,隨後再餵給 .py 做人臉的相似度(similarity)比對。這隻影像編碼程式只需在白名單(white list)有異動時重新執行以更新 faces_encoding.dat 檔即可。其中,白名單內的各筆成績資料皆為虛擬的,而這些內容也已 Python 的字典(dictionary)結構寫死在程式內。如果讀者有興趣,可將之改連後端的資料庫。
註:讀者可依照自己的白名單內容修改之。如果執行此程式時出現的 錯誤時,請抽換產生錯誤的照片(錯誤的原因可能是人臉的資料無法被識別)。
encodingFaces_04182022.py
import face_recognition
import pickle #object serialization
#dictionary,待識別照片候選字典
known_face_list = [
{
"name": "Ted Lee",
"filename": "Ted Lee.jpg",
"hw1": 89,
"mid": 88,
"hw2": 95,
"final": 90,
"face_encoding": None
},
{
"name": "趙大明",
"filename": "趙大明.png",
"hw1": 94,
"mid": 68,
"hw2": 89,
"final": 90,
"face_encoding": None
},
{
"name": "錢小英",
"filename": "錢小英.png",
"hw1": 98,
"mid": 99,
"hw2": 87,
"final": 94,
"face_encoding": None
}
]
for data in known_face_list:
image = face_recognition.load_image_file(data["filename"])
data["face_encoding"] = face_recognition.face_encodings(image)[0]
with open("faces_encoding.dat", "wb") as f:
pickle.dump(known_face_list, f)
備妥 faces_encoding.dat 後,執行下方用來辨識人臉與視窗資料更新程式。
AI 成績查詢系統.py
import face_recognition #####
import cv2 #####
import numpy as np #argmin()
import pickle #object serialization, API:
from PIL import ImageFont, ImageDraw, Image
from tkinter import *
from PIL import Image, ImageTk
name = ''
hw1 = 0
mid = 0
hw2 = 0
final = 0
def cleanUp():
window.destroy()
cap.release()
cv2.destroyAllWindows()
def update():
#取影像
success, frame = cap.read() #回傳攝影機讀到的影像
#辨臉
recognizeImage(frame)
#更新 UI
cv2image = cv2.cvtColor(frame, cv2.COLOR_BGR2RGBA) #転影像格式
img = Image.fromarray(cv2image)
imgtk = ImageTk.PhotoImage(image=img)
lblPhoto.imgtk = imgtk
lblPhoto.config(image = imgtk)
lblNameText.config(text = name)
lblHW1Text.config(text = hw1)
lblMidText.config(text = mid)
lblHW2Text.config(text = hw2)
lblFinalText.config(text = final)
lblPhoto.after(10, update)
#要影像 --------------------------------------------------------------------------------------------------------
def recognizeImage(frame):
global name
global hw1
global mid
global hw2
global final
with open("faces_encoding.dat", "rb") as f:
known_face_list = pickle.load(f)
known_face_encodings = [data["face_encoding"] for data in known_face_list]
#ret, frame = cap.read() #####讀影像
rgb_frame = cv2.cvtColor(frame, cv2.COLOR_BGR2RGB) #####
face_locations = face_recognition.face_locations(rgb_frame)
face_encodings = face_recognition.face_encodings(rgb_frame, face_locations)
for (top, right, bottom, left), face_encoding in zip(face_locations, face_encodings):
face_distances = face_recognition.face_distance(known_face_encodings, face_encoding)
best_match_index = np.argmin(face_distances)
#這是誰?
img = frame
if face_distances[best_match_index] < 0.5: #03232022 tune
print("Recognized.")
name = known_face_list[best_match_index]["name"]
hw1 = known_face_list[best_match_index]["hw1"]
mid = known_face_list[best_match_index]["mid"]
hw2 = known_face_list[best_match_index]["hw2"]
final = known_face_list[best_match_index]["final"]
else:
print("Not recognized.")
name = ""
hw1 = 0
mid = 0
hw2 = 0
final = 0
cap = cv2.VideoCapture(0) #####開啟攝影機
#開 window ------------------------------------------------------------------------------------------------
window = Tk()
window.title('AI 成績查詢系統 powered by Ted Lee')
#window.geometry('1024x768')
window.attributes('-fullscreen', True)
#最外層 frame ---------------------------------------------------------------------------------------------
frmInfo = Frame(window)
frmInfo.pack(side = TOP, fill = BOTH, expand = YES)
#放 widges-------------------------------------------------------------------------------------------------
#姓名
lblName = Label(frmInfo, text = "姓名:", font=('標楷體', 40))
lblName.grid(row = 0, column = 0, sticky = E)
lblNameText = Label(frmInfo, text = name, font=('標楷體', 40))
lblNameText.grid(row = 0, column = 1, sticky = W)
#HW1
lblHW1 = Label(frmInfo, text = "作業1:", font=('標楷體', 40))
lblHW1.grid(row = 1, column = 0, sticky = E)
lblHW1Text = Label(frmInfo, text = str(hw1), font=('標楷體', 40))
lblHW1Text.grid(row = 1, column = 1, sticky = W)
#期中考
lblMid = Label(frmInfo, text = "期中考:", font=('標楷體', 40))
lblMid.grid(row = 2, column = 0, sticky = E)
lblMidText = Label(frmInfo, text = str(mid), font=('標楷體', 40))
lblMidText.grid(row = 2, column = 1, sticky = W)
#HW2
lblHW2 = Label(frmInfo, text = "作業2:", font=('標楷體', 40))
lblHW2.grid(row = 3, column = 0, sticky = E)
lblHW2Text = Label(frmInfo, text = str(hw2), font=('標楷體', 40))
lblHW2Text.grid(row = 3, column = 1, sticky = W)
#期末考
lblFinal = Label(frmInfo, text = "期末考:", font=('標楷體', 40))
lblFinal.grid(row = 4, column = 0, sticky = E)
lblFinalText = Label(frmInfo, text = str(final), font=('標楷體', 40))
lblFinalText.grid(row = 4, column = 1, sticky = W)
#照片
lblLSpace = Label(frmInfo, text = " ")
lblLSpace.grid(row = 0, column = 2, sticky = W, rowspan = 5)
frmPhoto = Frame(frmInfo, bg="white")
frmPhoto.grid(row = 0, column = 3, sticky = W, rowspan = 5)
lblPhoto = Label(frmPhoto)
lblPhoto.pack()
update()
window.bind('<Escape>', lambda e: cleanUp())
mainloop()
我們先將完整程式碼列於前頭是方便讀者建立綜觀。本文的核心有兩個:人臉辨識和 GUI,前者的程式碼很短,因為它利用 CVZone 函式庫向攝影機取得即時(real time)影像後立即送給 face_recognition 函數做後續識別;而後者的程式碼雖然較冗長,但只要抓住佈局管理員(layout manager)和視窗容器(container)、視窗元件(widgets,window gadgets)的邏輯關聯性也就能輕鬆掌握其間的脈絡的。
接下來各節,我們將會對此程式做功能拆解(functional decomposition)以完整說明個中奧秘所在:
程式設計就是拼個「編程邏輯」,邏輯對了,程式指日可成
~Ted Lee
3 行程式碼開視窗
在這篇文章中提到 Python 迷人之處在以 3 行程式碼就能開出一個視窗(相較於 Java 的 1x 行),如圖 7 所示。
3 行開視窗.py
from tkinter import * #引用 Tkinter 框架
window = Tk() #宣告一個視窗物件
window.mainloop() #刷新(refresh)視窗
圖 7:3 行引用 Tkinter 框架開啟的視窗
接下來幾節我們將介紹視窗程式設計(window programming)的一連串概念(我們沒有打算包山包海的針對所有細節做贅述,那是著書出版的事。也就是說,本文僅僅說明示例中會用的知識內容):
視窗的空間魔法師──佈局管理員 è 視窗元件及其屬性(properties) è 視窗事件處理(event handling)──回呼函數(callback function)
視窗程式設計:佈局管理員
在視窗程式設計世界裡,為了便於視窗內的空間規畫(隔間),多半都會聘有一專責管理員來統一管理視窗的版面。本範例僅就用到的箱子(pack)[3] 與網格(grid)[4] 佈局做說明,就好像申請表單(application form)那樣一般。
第一步,對視窗畫面要先有想像。什麼是先有想像呢?我們在動手編寫程式之前,都會先畫出如圖 8 的設計稿:
- 左:以一個 5×3 網格來安排要顯示的視窗 window
- 中:在 window 中塞入一個框架(Frame) frmInfo(文後詳述)
- 右:在 frmInfo 中的各網格內塞入文字及照片標籤(Label)元件(文後詳述)
我們可以把外框想像成相框。Tkinter 視窗元件有一個共同的語法格式:
物件名稱 = 視窗元件(上層容器, 屬性)
這些元件都以容器(container)的方式相互依存,例如:視窗物件(object) window 是最外層,window 裡頭包著外框物件 frmInfo,frmInfo 裡頭再包其他元件的物件。我們可以從下列的程式中得到圖 9 的執行畫面。
塞 frame.py
from tkinter import *
window = Tk()
#塞入 frame
frmInfo = Frame(window, highlightbackground = "blue", highlightthickness = 10, width = 1024, height = 768)
frmInfo.pack()
window.mainloop()
圖 9:在 window 中加入一藍邊的外框元件 frmInfo
文字標籤元件 lblHello
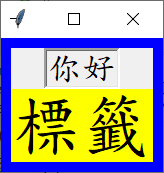
承上節,我們在 frmIngo 中塞入二個文字標籤 lblHello1 和 lblHello2 做對照。
塞 labels.py
from tkinter import *
window = Tk()
#塞入 frame
frmInfo = Frame(window, highlightbackground = "blue", highlightthickness = 10, width = 1024, height = 768)
frmInfo.pack()
#塞入 labels
lblHello1 = Label(frmInfo, text = "你好", font=('標楷體', 20), borderwidth = 3, relief = "sunken")
lblHello1.pack()
lblHello2 = Label(frmInfo, text = "標籤", font=('標楷體', 40), bg = "yellow")
lblHello2.pack()
window.mainloop()
影像標籤元件 lblPhoto
和上小節的文字標籤相似,不同的是改成向攝影機取得一張張即時的影像再塞入 lblPhoto 之中。我們修微修改這個例子,參考的程式碼如下列的「Labe image.py」所示,而圖 11 是程式的執行。註:這個程式片斷並未處理視窗結束後關閉攝影機(這是個很不好的程式寫作習慣!)。讀者們可參考本文最前頭的完整程式碼自我挑戰看看,提示:cleanUp()。
Labe image.py
import cv2
from tkinter import *
from PIL import ImageTk, Image
def update():
_, pic = camera.read()
cv2image = cv2.cvtColor(pic, cv2.COLOR_BGR2RGBA)
image = Image.fromarray(cv2image)
imagetk = ImageTk.PhotoImage(image = image)
lblPhoto.imagetk = imagetk
lblPhoto.configure(image = imagetk)
lblPhoto.after(1, update) #callback function
window = Tk() #window
frmPhoto = Frame(window, bg = "white").pack() #frame
lblPhoto = Label(frmPhoto) #label
lblPhoto.pack()
camera = cv2.VideoCapture(0)
update()
window.mainloop()
回呼函數 lblPhoto.after()
在上小節的「Labe image.py」中,只要 1ms 就會自動刷新畫面,這個神秘的面紗就是在影像標籤上使用回呼函數達成的:
lblPhoto.after(1, update)
我們使用 Thonny 的除錯模式(debug mode),一步步追踪(trace)程式碼的執行過程,以協助讀者理解這函數到底是如何被「回呼」的。再請您點入這段影片細細品味囉…。
進階思考
有沒有辦法讓系統「自動學習(automatic learning)」白名單的建立方式呢?例如:只要使用者刷臉並出示學生證後就能將其人臉資料自動新增到系統資料庫中。這部份的問題就留給讀者們發展自己的演算法(algorithm)來實現(implement)了…。
此外,讀者可以再思考這樣一個問題:
我該用結構化程式設計(structural programming)或物件導向程式設計(Object-Oriented Programming,OOP)來思考編程問題?
針對同一問題,以下列有兩種風格的程式碼,提供給讀者們進一步深入研究:
- 結構化:
import cv2
import tkinter as tk
from PIL import ImageTk, Image
def video_stream():
_, pic = cam.read()
frame = pic.copy()
cv2image = cv2.cvtColor(frame, cv2.COLOR_BGR2RGBA)
img = Image.fromarray(cv2image)
imgtk = ImageTk.PhotoImage(image=img)
video.imgtk = imgtk
video.configure(image=imgtk)
video.after(1, video_stream)
root = tk.Tk()
videoFrame = tk.Frame(root, bg="white").pack()
video = tk.Label(videoFrame)
video.pack()
cam = cv2.VideoCapture(0)
video_stream()
root.mainloop()
- 物件導向:
最後,我們將本文的完整程式碼抽出骨架 [5] 如下,主程式呼叫 update() 副程式,它再呼叫 recognizeImage()。然後印出全域變數(global variable) name 的內容。請再和完整程式中 recognizeImage() 副程式內的第一行 global name 比較。為什麼不加保留字(reserved word)會錯呢?這部份就留給讀者們細細研究囉。提示:和 Tkinter 的 mainloop() 有關。
name = 'Ted Lee'
def update():
recognizeImage()
def recognizeImage():
print(name)
update()
- 六種授權條款。
- 根據我們教授 Java Swing 的視窗程式設計經驗,雖然 Python 的 PyQt (和Visual Basic Editor 同設計風格的拖拉視窗元件就可以產生視窗。Java 在 Eclipse IDE 上也有類似的外掛(plugin)叫 WindowBuilder)有號稱以拖拉方式就能設計視窗應用程式的 Qt Designer 可以先不理會其自動產生的程式碼,但玩到最後會發現,一但版面不符合需求而要修改細節時,就又得重新回去理解這些程式碼。所以,我們選擇以「拋棄式學習法(Disposable Learning)」,一次學會就都會了的蹲馬步硬功夫,硬著頭皮以一行一行程式碼去測試、拼湊出本文的 UI。讀者們最終會發現:啊不就是容器套疊而已!此外,在 Python 裡裝新套件有時會是…心中永遠的痛。所以,能不裝,就不要多花時間去甞試!
- 佈局管理員預設(default)的元件擺放方式,以積木層層堆疊方式由下往上置放。
- 以表格(table)來想像。
- 能將一卡車程式碼「化繁為簡」而取出功能片段也是很重要的編程能力喔!


沒有留言:
張貼留言