請舉出一部IoT應用至餐飲業的影片,以留言的方式寫下:
- 學号
- 姓名
- 搜尋関鍵字
- 影片名稱
- 影片連結
- 影片內容簡介
P.S.留言以先交先贏方式採計:若搜尋到相同的影片,以先PO者勝之!
 [1]
int brightness = 0;    // how bright the LED is
int fadeAmount = 5;    // how many points to fade the LED by
void setup()  {
  // declare pin 9 to be an output:
  pinMode(9, OUTPUT);
}
void loop()  {
  // set the brightness of pin 9:
  analogWrite(9, brightness);
  // change the brightness for next time through the loop:
  brightness = brightness + fadeAmount;
  // reverse the direction of the fading at the ends of the fade:
  if (brightness == 0 || brightness == 255){
    fadeAmount = -fadeAmount ;
  }
  delay(30); // wait for 30 milliseconds to see the dimming effect
}
流程圖(.vsdx)[1] ,F/W版本:0.9.2,AP mode的預設SSID為v7688_cfg
 有兩种切換的方法:第一、長按WiFi按鈕5秒;第二、晶片reset:長按WiFi按鈕20秒。


 ,或者以英文命名的手機熱奌(hot spot)


 [1]
 後的程式碼(註三)為:
/*
  Blink
  Turns on an LED on for one second, then off for one second, repeatedly.

  Most Arduinos have an on-board LED you can control. On the Uno and
  Leonardo, it is attached to digital pin 13. If you're unsure what
  pin the on-board LED is connected to on your Arduino model, check
  the documentation at http://www.arduino.cc

  This example code is in the public domain.

  modified 8 May 2014
  by Scott Fitzgerald
 */


// the setup function runs once when you press reset or power the board
void setup() {
  // initialize digital pin 13 as an output.
  pinMode(13, OUTPUT);
}

// the loop function runs over and over again forever
void loop() {
  digitalWrite(13, HIGH);   // turn the LED on (HIGH is the voltage level)
  delay(1000);              // wait for a second
  digitalWrite(13, LOW);    // turn the LED off by making the voltage LOW
  delay(1000);              // wait for a second
}
它对應的程式流程圖為:

void setup() {

}
|
void loop() {

}
|
 及接線影片[1]
 [1]
int brightness = 0;    // how bright the LED is
int fadeAmount = 5;    // how many points to fade the LED by
void setup()  {
  // declare pin 9 to be an output:
  pinMode(9, OUTPUT);
}
void loop()  {
  // set the brightness of pin 9:
  analogWrite(9, brightness);
  // change the brightness for next time through the loop:
  brightness = brightness + fadeAmount;
  // reverse the direction of the fading at the ends of the fade:
  if (brightness == 0 || brightness == 255){
    fadeAmount = -fadeAmount ;
  }
  delay(30); // wait for 30 milliseconds to see the dimming effect
}
流程圖(.vsdx)

 [1]
 ;
 ,即稱為此電路的迴路。
 [3]


 及通信使用的埠号(port number)
 :

 後的程式碼(註三)為:
/*
  Blink
  Turns on an LED on for one second, then off for one second, repeatedly.

  Most Arduinos have an on-board LED you can control. On the Uno and
  Leonardo, it is attached to digital pin 13. If you're unsure what
  pin the on-board LED is connected to on your Arduino model, check
  the documentation at http://www.arduino.cc

  This example code is in the public domain.

  modified 8 May 2014
  by Scott Fitzgerald
 */


// the setup function runs once when you press reset or power the board
void setup() {
  // initialize digital pin 13 as an output.
  pinMode(13, OUTPUT);
}

// the loop function runs over and over again forever
void loop() {
  digitalWrite(13, HIGH);   // turn the LED on (HIGH is the voltage level)
  delay(1000);              // wait for a second
  digitalWrite(13, LOW);    // turn the LED off by making the voltage LOW
  delay(1000);              // wait for a second
}
/*
  Blink
  Turns on an LED on for one second, then off for one second, repeatedly.

  Most Arduinos have an on-board LED you can control. On the Uno and
  Leonardo, it is attached to digital pin 13. If you're unsure what
  pin the on-board LED is connected to on your Arduino model, check
  the documentation at http://www.arduino.cc

  This example code is in the public domain.

  modified 8 May 2014
  by Scott Fitzgerald
 */


// the setup function runs once when you press reset or power the board
void setup() {
  // initialize digital pin 13 as an output.
  pinMode(13, OUTPUT);
}

// the loop function runs over and over again forever
void loop() {
  digitalWrite(13, HIGH);   // turn the LED on (HIGH is the voltage level)
  delay(1000);              // wait for a second
  digitalWrite(13, LOW);    // turn the LED off by making the voltage LOW
  delay(1000);              // wait for a second
}
void setup() {

}
|
void loop() {

}
|
 (.fzz)及接線影片[4]


 。
#include <Servo.h>
#include <SoftwareSerial.h>
#include <IRremote.h>

const int irReceiverPin = 2; //紅外線接收器輸入訊號接在Arduino第2腳
IRrecv irrecv(irReceiverPin); //宣告IRrecv物件來接收紅外線訊號
decode_results results;

Servo servo_0, servo_1, servo_2, servo_3;

int i0 = 110;
int i1 = 150;
int i2 = 110;
int i3 = 130;
int i0max = 180;
int i0min = 0;
int i1max = 180;
int i1min = 90;
int i2max = 150;
int i2min = 50;
int i3max = 160;
int i3min = 100;

void setup() {
  Serial.begin(9600);
  irrecv.enableIRIn();
  delay(100); //等候信号穩定

  servo_0.attach(11); //buttom
  servo_0.write(i0);

  servo_1.attach(10); //right(面对爪子)
  servo_1.write(i1);

  servo_2.attach(9); //left
  servo_2.write(i2);

  servo_3.attach(5); //claw
  servo_3.write(i3);

  delay(100); //等候信號穩定
} //end of setup()

void loop() {
  if (irrecv.decode(&results)) {
    if (results.value != -1) {
      showIRProtocol(&results);   //顯示紅外線協定的種類
      Serial.println(results.value, HEX);

      switch (results.value) {
        case 0x38863BF8: //前進
          Serial.println("0x2F0:forward");

          if (i2 < i2max) i2++;
          break;
        case 0x38863BC4: //左轉
          Serial.println("0x2D0:turn left");

          if (i0 > i0min) i0++;
          break;
        case 0x38863BE4: //右轉
          Serial.println("0xCD0:turn right");

          if (i0 > i0min) i0--;
          break;
        case 0x38863BC8: //後退
          Serial.println("0xAF0:back");

          if (i2 >= i2min) i2--;
          break;
        case 0x38863BE8: //上移
          Serial.println("0x90:up");

          if (i1 < i1max) i1++;
          break;
        case 0x38863BD8: //下移
          Serial.println("0x890:down");

          if (i1 > i1min) i1--;
          break;
        case 0x38863BE0: //夾緊
          Serial.println("0x490:tight");

          if (i3 < i3max) i3++;
          break;
        case 0x38863BD0: //放鬆
          Serial.println("0xC90:loose");

          if (i3 > i3min) i3--;
          break;
      }//end of switch
    }//end of if

    irrecv.resume(); //Receive the next value

    servo_0.write(i0); //設定四軸初始的転角
    servo_1.write(i1);
    servo_2.write(i2);
    servo_3.write(i3);

    Serial.print("i0 pos ="); //顯示四軸的転角pos
    Serial.println(i0);
    Serial.print("i1 pos =");
    Serial.println(i1);
    Serial.print("i2 pos =");
    Serial.println(i2);
    Serial.print("i3 pos =");
    Serial.println(i3);
    delay(10); //等候信号穩定

    Serial.flush();
  } //end of if
} //end of loop()

void showIRProtocol(decode_results *results) {
  Serial.print("Protocol: ");

  //判斷紅外線協定種類
  switch (results->decode_type) {
    case NEC:
      Serial.print("NEC");
      break;
    case SONY:
      Serial.print("SONY");
      break;
    case RC5:
      Serial.print("RC5");
      break;
    case RC6:
      Serial.print("RC6");
      break;
    default:
      Serial.print("Unknown encoding");
  } //end of switch()

  //把紅外線編碼印到 Serial port
  Serial.print(", irCode: ");
  Serial.print(results->value, HEX);    // 紅外線編碼
  Serial.print(",  bits: ");
  Serial.println(results->bits);        // 紅外線編碼位元數
} //end of showIRProtocol()

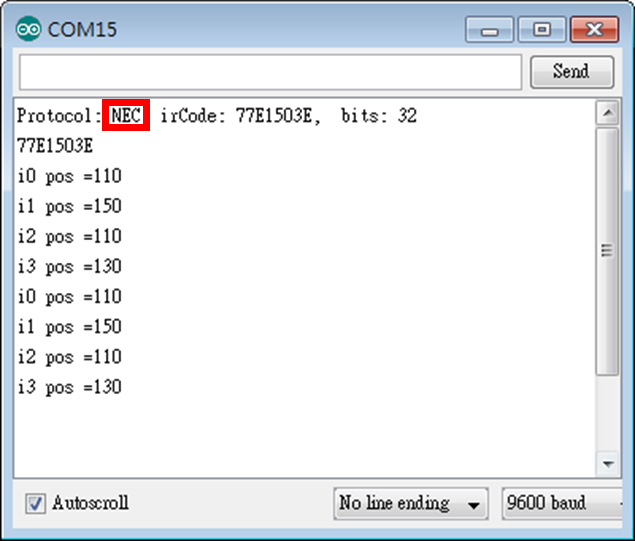
 來測試,程式修改處如粉紅色标示處,我們拿到了遙控器识別的副程式showIRProtocol(),並逐一將按鍵的內碼填到方向控制的switch选項內(例如:0xC1AA09F6表示前進)。


